Rhodes Hill Care Center (Grace) - Part 2 Guide

Main Mission
Rhodes Hill Care Center (Grace) - Part 2 Quest Summary
Now armed with the Requiem, Grace reaches the Care Center's main hall thanks to Leon.
She has to search the West and East Wing for three Quartz pieces (Moon, Sun, and Star) needed to unlock the Central Hall's indented door.
Timestamp: October 8, 11:42 PM
Rhodes Hill Care Center (Grace) - Part 2 Walkthrough
[1] Escape the Care Center.
Just as Leon and Grace talk for the first time during "Rhodes Hill Care Center (Leon) - Part 1", Dr. Gideon's interference separates them again.

Grace starts the mission with Leon's revolver, but it only has a single bullet. It's important to only use it for drastic situations.

[2] Find and Place the Quartz.
After inspecting the Door with Indents in Central Hall, Grace needs to figure out how to unlock it to move forward.
Go downstairs and head to the Guard's Office, there's a Typewriter and some items to collect:
| Point of Interest (Guard's Office) | Image | Details |
|---|---|---|
| Antique Coin |  | Found on top of a desk, next to the PC monitor. |
| Item Box |  | Place an item inside the storage to get the "Out of Sight, Out of Mind" Trophy. |
| Care Center Pamphlet |  | Pick up the Pamphlet next to the scattered papers on the table. |
| Whiteboard Scrawl |  | Near the exit, interact with the whiteboard to get this file. |
Next, pass through the red-lit door to reach the Medication Room.
Grace meets a trapped little girl. For now, grab the West Wing Keycard to progress.

Return to the Central Hall and use the keycard on the West Wing Card Reader.
Proceed down the corridor until the Kitchen door is seen.

Enter and stay quiet while moving through this area to avoid alerting The Chef.
| Step | How to Escape from The Chef | Image |
|---|---|---|
| 1 | The nearest door from the entrance is the Pantry, but this is locked. |  Tip: Defeat the Chef to get the Pantry Key. Grace can return here later on when she's more equipped. Tip: Defeat the Chef to get the Pantry Key. Grace can return here later on when she's more equipped. |
| 2 | Grace must sneak across toward the other door on the far side of the Kitchen. She has to push the cart carefully to reach the exit. |  |
| 3 | The Chef is busy preparing a meal, so watch its cues. This monster has a pattern before turning around. It's Grace's sign to hide. |  |
| 4 | Stay away or crouch when the Chef says, "Next...is..". It turns around after saying, "Wrong... wrong....". |  |
| 5 | Upon exiting the Kitchen, Grace should also stay clear of a roaming Infected in the hallway, which is specifically attracted to light. |  Tip: Make use of Lightswitch 1, 2, and 3 to avoid the creature. Tip: Make use of Lightswitch 1, 2, and 3 to avoid the creature. |
While in this area, pick up the Makeshift Knife and Green Herb before heading to the Dining Room.
| Point of Interest (Dining Room) | Details |
|---|---|
| B934 | On the floor next to the dining table. |
| Empty Bottle | Located on the shelf on the left side of the room. |
After leaving the Dining Room, there's a Filing Room where Grace can loot more items such as another Makeshift Knife inside the locker and some Handgun Ammo on the table.
| Point of Interest (Filing Room Hallway) | Image | Details |
|---|---|---|
| Antique Coin |  | Go outside and pick up this Coin on a small table along the way. |
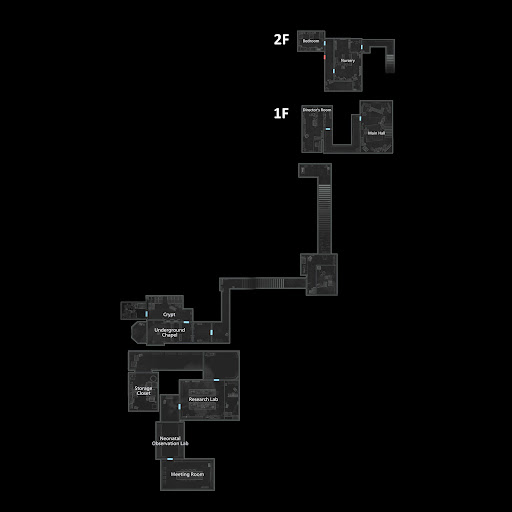
Climb the stairs, defeat or avoid the Infected, and interact with the West Wing Map on the second floor wall.

The next area Grace must explore is the Bar & Lounge, where three enemies await. Two are standard zombies, while the third is a singing woman with a voice that can stagger Grace.

| Point of Interest (Bar & Lounge) | Image | Details |
|---|---|---|
| Antique Coin 1 & 2 |   | ・On top of a Piano. ・ Dropped by the Singing Lady. |
| Bar & Lounge Safe |  | Located on the bar counter. Casual / Normal Difficulty: Open the Safe by turning the dial left to 10, right to 80, and finally left to 30. This contains Antique Coin x 3. Note: The combination is indicated on this File. |
| S&S M232 |  | Get another pistol by picking this up on the bar counter. |
Beyond the hallway, Grace enters the Gallery to find a new clue about the first quartz:
| Point of Interest (Gallery) | Image | Details |
|---|---|---|
| Folded Note |  | Examine the lab coat hanging on the wall. |
After reading the note, investigate the Chairman’s Office.
| Point of Interest (Chairman’s Office) | Image | Details |
|---|---|---|
| Unicorn Trinket Box & Red Jewel |   | Rotate the Trinket Box and press the button to get a Red Jewel. |
| Copy of an Email to a Manager |  | On top of a drawer. |
| Note to the Chairman |  | Found inside the trash bin. |
| Step | How to Solve the Moon Quartz Puzzle | Image |
|---|---|---|
| 1 | Grab the Pencil on the table. |  |
| 2 | Use it to shade the Torn Journal and reveal the hidden text of the Chairman’s Note. |  |
| 3 | Using the Note, Grace can now solve the Puzzle. Solution: Moon → Sun → Star → Moon |  |
With one of the three Quartz collected, Grace can go out and proceed down the hallway that leads back to the Central Hall.
Place the Moon Quartz on the locked door, then take a quick stop at the Guard's Office to save progress before heading back to the West Wing.

Open the Parlor Door by inserting the Red Jewel that Grace collected from the Chairman’s Office earlier.

| Point of Interest (Parlor) | Image | Details |
|---|---|---|
| Antique Coin 1 & 2 |  | ・Found on the Roulette Table. ・ Get another Coin for solving the Roulette Wheel Puzzle. |
| East Wing Keycard |   | Examine the severed limb lying beneath the table. |
| Antique Coin 3 & 4 |   | Two additional Coins are located at the far end of the bar counter. |
| Antique Coin Cabinets |  | Grace can insert Antique Coins to get these items: ・Hip Pouch - 3 Coins ・Stabilizer - 4 Coins ・ Steroids - 4 Coins ・Override Manual - 6 Coins |
Explore the West Wing further and defeat The Chef, who now roams the area. Get the Pantry Key to access additional items like Connoisseur Charm, Stakeout Takeout Charm, and the Order Up! Trophy.

Grace can also return to the little girl at the Medication Room to see how she's doing. This triggers a conversation about her previous cellmate, Marie.
Head back to the Central Hall to use the keycard on the East Wing Card Reader.
| Point of Interest (East Wing Lobby) | Image | Details |
|---|---|---|
| Mr. Raccoon |  | After entering the East Wing Lobby, Grace can get this Mr. Raccoon Memoriam. |
Then, head to the Examination Room.
| Point of Interest (Examination Room) | Image | Details |
|---|---|---|
| Hemolytic Injector & Fatal Dose Trophy |   | Get a Trophy for sneaking up to an enemy and using the Hemolytic Injector to defeat it. |
| Examination Room Safe |  | Found on a shelf. Casual / Normal Difficulty: Turn the dial right to 30, left to 10, and finally right again to 50. It contains Antique Coin x 3. Note: The combination is listed on this File. |
Move past the Treatment Room and keep walking to reach the Blood Lab.
| Point of Interest (Blood Lab) | Image | Details |
|---|---|---|
| Blood Collector |  | Located next to the lab's sink. Tip: Get Infected Blood from this nearby bucket. |
| Blood Compound Synthesis |  | On top of a desk. |
| Step | How to Analyze Blood Specimen | Image |
|---|---|---|
| 1 | Grab the Blood Specimen (Denatured) on the table. |  |
| 2 | Use the Laser Microscope. |  |
| 3 | Open the Analyzer and activate all atoms. |  Completing this unlocks the Handgun Ammo and Hemolytic Injector Recipe. |
Return to the hallway and proceed to the corridor with red lights. Grace needs to defeat or sneak past three zombies here before reaching the Waiting Room.

| Point of Interest (Waiting Room) | Image | Details |
|---|---|---|
| Antique Coin |  | On a small table. |
| Internal Dispute Trophy |  | 1. Hit the Vase on the right side of the Room. 2. Hide and wait for the Blind Zombie and Maid Zombie. 3. Throw an Empty Bottle at the Maid Zombie. |
| Antique Coin x 2 |  | Inside the Open Safe. |
| Safe Replacements |  | Just next to the Safe. |
| Transfusion Bag |  | Defeat the Blind Zombie to get this item. |
| East Wing Lobby Shortcut |  | Create a Shortcut to the East Wing Lobby by opening the locked door at the Waiting Room. |
After exploring the Waiting Room, Grace should head to the end of the hallway to locate a staircase. Collect Antique Coin 1, 2, and a Mr. Raccoon Memoriam before going to the second floor.

Similar to the West Wing, Grace can pick up the East Wing Map after reaching the upper area.
Enter the Lead Researcher's Office to search for more items.
| Point of Interest (Lead Researcher's Office) | Image | Details |
|---|---|---|
| Typewriter |  | Save Grace's current progress here. |
| Lockpick |  | On top of a small drawer in the corner. Tip: Use this to open the Simple Lock at the East Wing Lobby. Grace gets a Rare Metal and the Like Mother, Like Daugther Trophy. |
| Lead Researcher's Picture 1, 2, and 3 |    | There are three pictures to find inside the office. |
| Lead Researcher's Message |  | Found on top of a drawer on the other side of the Office. |
[3] Destroy the Padlock.
After reading the Lead Researcher's Message, Grace receives a new objective to melt the Padlock within the Office using a bottle of corrosive from the Conference Room.

| Step | How to Defeat Chunk | Image |
|---|---|---|
| 1 | Walk outside and approach the headless corpse wearing the ID Wristband (Level 1). |  |
| 2 | The huge zombie, Chunk, appears for the first time and surprises Grace. Unlike other normal Infected, Grace has to deal a lot of damage before she defeats this creature. |  |
| 3 | Retreat to the Lead Researcher's Office to lure Chunk. It becomes stuck at the door. Use this as an opportunity to attack. |  |
| 4 | After some time passes, the creature retreats to patrol the East Wing. Grace can hunt it down using Injectors or repeat this process until the enemy dies. The reward for defeating Chunk is the Eye Spy Charm and "Grace and Goliath" Trophy. |  |
Once Chunk is defeated or leaves the second floor, pick up the Lv. 1 Wristband and proceed through the hallway.
| Point of Interest (Hallway & Conference Room) | Image | Details |
|---|---|---|
| Examination Room Safe Code |  | In the hallway outside the Conference Room, there's a file that provides the combination for a Safe. |
| Antique Coin & Singing Duet Trophy |   | Inside the Conference Room, Grace has to face another Singing Lady. The voice of this Infected awakens three more standard zombies. Grace must defeat this specific enemy, as well as the one she first encountered in the Bar & Lounge (West Wing). |
| Patient Medical Record |  | Next to the PC Monitor. |
| Corrosive |  | The Corrosive that Grace is looking for is a blue bottle located on top of a cabinet. |
| Antique Coin |  | As Grace leaves the room, don't forget to grab another Coin here. |
Return to the Lead Researcher's Office to melt the lock. As Grace enters the room, she meets Dr. Gideon again.

After escaping, Grace can finally destroy the padlock at the Office and access a Safe.
| Step | How to Solve the Sun Quartz Puzzle | Image |
|---|---|---|
| 1 | Use the Corrosive. |  |
| 2 | Inspect all Lead Researcher's Pictures for the symbols. Solution: Star → Sun → Moon → Sun |   |
| 3 | Get the Sun Quartz and Leatherbound Notebook inside after solving the puzzle. The notebook contains the Spencer's Research 1 and Unlocking the Organ Transport Box File. |  |
[4] Search for the 3rd Quartz.
With the Lv. 1 ID Wristband from earlier, Grace can explore more rooms. Start with the Closet at the Waiting Room.
| Point of Interest (Waiting Room Closet) | Image | Details |
|---|---|---|
| Blood Specimen (Converged) |   | Use the Analyzer at the Blood Lab and follow the Puzzle Solution. Grace gets the Med Injector and 12.7x55mm Ammo Recipe after. |
While in the Blood Lab, there's a Storage Room that Grace can unlock.
| Point of Interest (Blood Lab's Storage Room) | Image | Details |
|---|---|---|
| Blood Specimen (Reversible) |   | Another Blood Specimen is found here. This unlock the Steroid and Stabilizer Recipe. |
| Victor's Journal Entry |  | Next to the Blood Specimen. |
Head back to the West Wing for now. First, Grace can search the Pantry Door in the Filing Room.
| Point of Interest (Filing Room's Pantry) | Image | Details |
|---|---|---|
| Hip Pouch & Handgun Ammo |  | Located next to the Warped Closet. |
Next, go past the Parlor and Kitchen hallway and open the nearby Locked Door. There's a Green Herb that Grace can pick up along the way before going to the Custodian’s Office.

| Point of Interest (Custodian’s Office) | Image | Details |
|---|---|---|
| Construction Notice |  | Posted outside the Office Entrance. |
| Wrench |  | Next to a Typewriter on the table. |
Progress to the Garage afterward.
| Point of Interest (Garage) | Image | Details |
|---|---|---|
| Organ Transport Box |  | Found on the back of a truck. |
| Infected riding a Bulldozer |  | Once Grace turns back after getting the Transport Box, a zombie startles her. Shoot to kill the zombie. |
Exit by crawling through the bulldozer.
Continue ahead and climb the stairs to reach the Office, Records Room, and Kitchenette on the second floor.

| Point of Interest (Office) | Image | Details |
|---|---|---|
| Bar & Lounge Safe Code |  | This File provides the combination for a Safe. |
| Background Check |  | On top of a work desk. |
| Point of Interest (Records Room) | Image | Details |
|---|---|---|
| Disposal Team Report |  | Located inside a box. |
| Point of Interest (Kitchenette) | Image | Details |
|---|---|---|
| Mr. Raccoon |  | Located on top of a coffee maker. |
| Green Herb |  | By the sink. |
After collecting the items, Grace can go back down the first floor and use the Wrench to open the Door without Handwheel. This unlocks the Cold Storage Room.
| Point of Interest (Cold Storage) | Image | Details |
|---|---|---|
| Artificial Heart |  | The organ is hanging on the rack. |
Return to the Examination Room in the East Wing and approach the Organless Corpse.
Open the Organ Storage Box to get the Artificial Lungs. Insert this and the Artificial Heart from earlier inside the Corpse.

It attacks Grace after "coming back" to life. Defeat the zombie and loot the Corpse afterward for the ID Wristband (Level 2).

Go outside the hallway again. Grace can use her second wristband to open the nearby Locked Door. This path leads to the Isolation Ward and the Security Manager's Office.
| Point of Interest (Isolation Ward & Security Manager's Office) | Image | Details |
|---|---|---|
| Double Mutation & Nurse Log File |   | Pick up these items before proceeding to the next room. |
| Notebook & ID Wristband (Level 3) |  | Upon entering the Office, Grace discovers a dead man, along with a Notebook and the third Wristband. |
After inspecting the Safe for the final Quartz, Grace faces another problem. She can't understand the symbols since they are written in Braille.

[5] Set the Little Girl Free.
Since Grace finally has the third Wristband, she is able to help the little girl trapped in the Medication Room. Quickly go there for another cutscene.

| Point of Interest (Medication Room) | Image | Details |
|---|---|---|
| Mr. Raccoon |  | Don't forget to check the other cell. Find this Collectible near Marie's bed. Note: There's also a Doll that Grace can pick up here. |
[6] Take the Child to the Puzzle Box.
After setting Emily free, Grace must carry her while searching for a route back to the Security Manager's Office.

[7] Get Emily back.
Once they reach the Office, Emily focuses on solving the third quartz puzzle while Grace takes care of the incoming zombies.

Unfortunately, Grace's escape plan fails as she watches The Girl abduct Emily.
In a desperate attempt to rescue the little girl, Grace leaps into a gaping hole before this mission ends.

Continue with "Rhodes Hill Care Center (Leon) - Part 2" after the cutscene.
Rhodes Hill Care Center (Grace) - Part 2 Reward
| Related Trophy | How to Get |
|---|---|
| Out of Sight, Out of Mind | Unlocked after the player stores an item in the Item Box as Grace. |
| Order Up! | Defeat the Chef in the Kitchen. |
| Fatal Dose | Defeat a zombie using the Hemolytic Injector. |
| Science! | Unlock a Crafting Recipe using the Analyzer. |
| The Power of Blood | Craft an item using the Blood Collector. |
| Internal Dispute | Make a Zombie attack another Zombie. |
| Like Mother, Like Daugther | Unlock a Drawer with a Lockpick. |
| Deadly Duet | Defeat 2 Singing Zombies. |
| Grace and Goliath | Defeat Chunk as Grace. |