Rhodes Hill Care Center (Grace) - Part 3 Guide

Main Mission
Rhodes Hill Care Center (Grace) - Part 3 Quest Summary
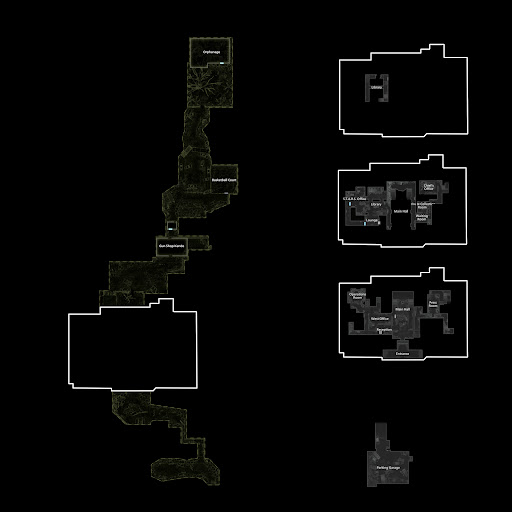
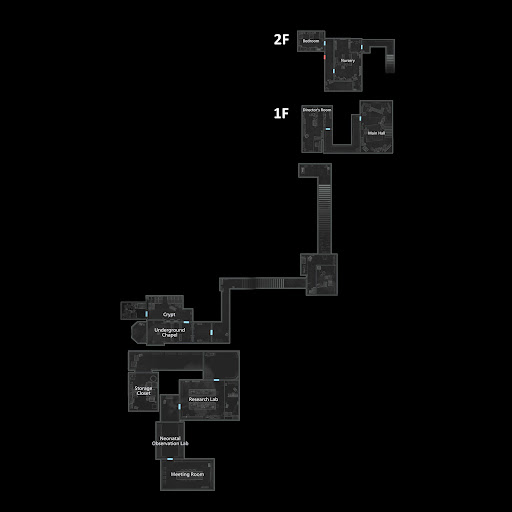
Grace lands in the Underground after jumping into the hole. While pursuing the monster to rescue Emily, she explores the Care Center's Basement and Courtyard.
Timestamp: October 9, 3:32 AM
Rhodes Hill Care Center (Grace) - Part 3 Walkthrough
[1] Rescue Emily.
After falling to the Underground of the Care Center, Grace needs to rescue Emily who's inside a cell.

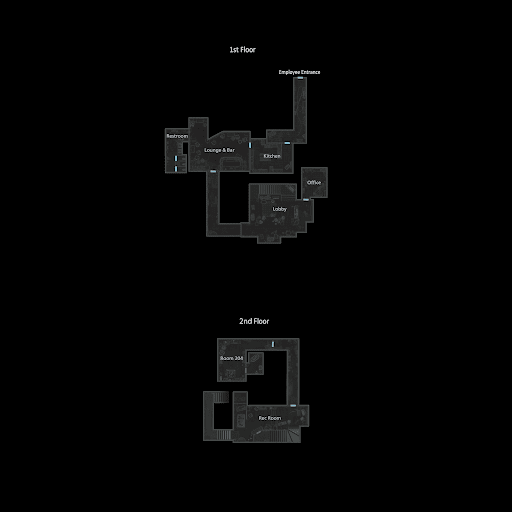
Advance through the Basement and save progress at the Typewriter found inside the Security Room.

[2] Find 3 Joint Plugs
Move forward to the Holding Cells and check out the Unlocking the Cells File posted on the wall.

After getting the clue, start finding the 3 Joint Plugs around the Basement. Grace must stay clear of The Girl while doing this objective.
Follow these steps to locate all Joint Plugs:
| Step | Details |
|---|---|
| 1 | Remove the First Joint Plug and connect it to the terminal to access the Workshop. |
| 2 | Move the Joint Plug to the Furnace terminal to progress. |
| 3 | Crawl through the vents to reach the Boiler Room and retrieve the Square Socket Wrench. |
| 4 | Use the Wrench at the Collection Pool to open the board and insert two Joint Plugs. |
| 5 | Crouch through the vents again and head to the Processing Room. |
| 6 | Use the Forklift Key to clear the path to the control room. |
| 7 | Drain the area using the valve and retrieve the third Joint Plug. |
Remove the first Joint Plug and grab the file, Unlocking the Cells, to know the locations of the other plugs.


The Girl shows herself as Grace begins to look for the other Joint Plugs. Remember, she's sensitive to sound so crouching helps a ton when sneaking around her.

There's a room with a Power Distributor straight ahead, opposite of the first Joint Plug. Insert the Joint Plug into the Power Distributor to gain access to the room. This also lights up the area making it safe from the Girl.

Inside is a sealed vent and the file, Technician's Note. It tells you about a toolbox Grace can get from the boiler room.

Retrieve Grace's only Joint Plug and head to the Furnace. Explore inside, at the end of the path is a forklift and another Joint Plug. Grab the plug and come back to the forklift later, Grace needs the key first.

Head to the boiler room. When Grace inserts the Joint Plug here, she gains access to the Bunkroom as well. There are tons of loot inside and a Mr. Raccoon Memoriam on top of the TV.

Grace can enter the boiler room now but she won't be able to access some areas due to the electric puddles. Retrieve the Joint Plug and head northeast instead, walk to the end of the hallway and turn left near the elevator.

Insert the Joint Plug and head inside. Move the crate to enter the boiler room through the broken fence.

Explore the previously inaccessible areas and grab the Square Socket Wrench from the toolbox next to the corpse.
Grace can only exit through the fence but as she approaches it, the Girl appears. Throw an empty bottle to distract it or sneak around carefully to exit through the fence.

Retrieve the Joint Plug and head back towards the furnace. Just south of the furnace is an open doorway, head inside and open the Power Distributor with the Square Socket Wrench. (Note: Before proceeding, Grace can head back to the sealed vent from the first room and open it, it helps her later.)


Insert the plugs to light up the area. Explore further and crawl through the big fans.

Explore further and climb the ladder. Continue forward until Grace reaches another forklift, the Forklift Key is on the corpse right next to it.
Activate the forklift and loot the room.

Grace can't take the Joint Plug here yet so head back to the collection pool and collect the two you had earlier. Head all the way back to the first forklift in the furnace.
The Girl is waiting for you near the forklift, sneak around her and insert the Joint Plug to scare her off with the light. Grace can also use one Requiem shot to stun her and get past her.

Activate the forklift and head inside.

The lever controls the direction of the hanging bodies. Grace can make them go left to loot the lockers in the left corner of the room but to progress she has to start with the bodies turning right.

Move the cart to make a new path. Turn the lever again and pass through the new path to progress.

Be careful here, some of the hanging enemies can grab Grace and attack her.

Continue following the bodies until Grace reaches the other side of processing. She can save here before heading down.


When ready, turn the wheel and head down to the grinder. Grace just needs to survive here until the sequence is complete. Sometimes enemies can spawn beside or behind her so always be aware.

Grab the final Joint Plug and crawl through the fan near the typewriter.

Grace ends up in the collection pool, she can use the switch here to drain the blood and collect samples.

Use the elevator and collect all the previous Joint Plugs. If you opened the sealed vent earlier, Grace can enter through the furnace, grab the plug, and crawl through the vent to exit.
Just be ready for the Girl, who's ready to surprise Grace at the other end of the vent near the forklift.
When Grace grabs the final Joint Plug from the furnace, new enemies will spawn so be ready.

[3] Escape via the Elevator.
Once all Joint Plugs are collected, head back to the Holding Cells and insert all 3 Joint Plugs into the Power Distributor. This will set Emily free.

After that, Grace and Emily must quickly reach the Elevator to escape.

[4] Unlock the Central Hall's Door.
When the two reaches the upper floor safely, Grace receives the Star Quartz from Emily.

Use this along with the other two Quartz that Grace found earlier to finally unlock the door in Central Hall.
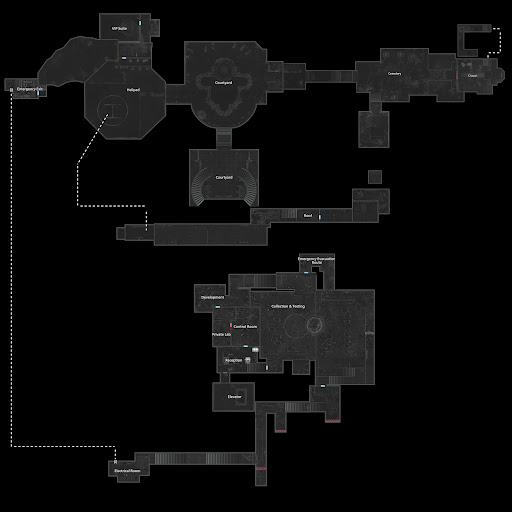
[5] Escape via the Courtyard.
As Grace and Emily approach the helipad in the Courtyard, they meet a pilot named Harry.

[6] Find the Helicopter Key.
Go inside the Research Facility Zone and get the Helicopter Key at the Private Lab.

[7] Escape the Research Facility.
Head back and interact with the Helicopter to trigger a cutscene. The next quest, "Rhodes Hill Care Center (Leon) - Part 3", follows after that.